If we followed the traditional startup approach to building an MVP, we would've:
- Thrown up a landing page.
- Added a 90-second explainer video.
- Chucked ads to test it's stickiness.
I understand why that's appealing.
It's less risky, less expensive, and less work. But it doesn't answer the question, "Is it viable?"
We wanted to a working product. Something we could use. Something that typically takes a 5-7 person team and millions in funding. But with two people and no budget.
If you're looking for an MVP-in-a-weekend post, this isn't it.
If you want to see our secret process for building a production-ready MVP while bypassing the black hole of technical debt, keep reading.
Minimum Viable Product Roadmap
We asked:
"What is the fastest route to a useful, valuable, and delightful product that we can build in three months with zero technical debt?"
Here's our MVP roadmap roughly broken into three months:
- Pre-work - Before we started on the MVP, we built a mock marketing site with sales copy for the features I thought we wanted. This took a week or two before we officially started.
- Month One - We took the big list of features, built live mockups, and widdled the feature list into the fastest path to usefuleness. Then built a style and component guide to sidestep technical debt.
- Month Two - We laid the foundation for the web app with Ruby on Rails and made the marketing site with a static website generator.
- Month Three - Wrapped up the marketing site and built out client, project, and invoice systems for the MVP.
Let's start with the work before the work…
Mock Marketing Site and Sales Copy
There's an approach at Amazon called, "working backwards" where new products start with a press release.
They layout the problem, solution, customer experience, etc. prior to building anything. If there's no excitement, they don't build it.
To give us a starting point and better define what we're creating, I built a mock marketing site with a homepage, product tour, pricing page, comparison tables, FAQ, and 2,790 words of sales copy.
Here's a sneak peek:

The problem is that most freelancers struggle to get and keep clients… partly because they don't have a homebase for displaying their work, handling their clients, and professionally invoicing on projects.
The solution is to build a system that allows freelancers to showcase their portfolio, manage their clients, and get paid… all on their domain. An easy-to-set-up, low-cost, no-maintenance way for your clients to have a 100% branded journey from first message to final invoice.
Once we were both on board with the vision, it was time to define what we call, "The Minimum Happy Product".
The Minimum Happy Product
If an MVP tests viability, then an MHP tests happiness.
The goal of an MHP is to solve the customer's problem in a way that makes them happy.
As freelancers, we both saw the value in having everything bundled up on our domains. But we didn't agree on where to start.
I wanted a website builder, portfolio, client CRM, invoices, escrow payments, and marketing tools. Mike—our technical co-founder—wanted contracts, invoices, and Stripe-powered payments.
To help us decide and begin the MVP/MHP process, we built out live mockups for the two main parts of the product:
- Mission Control - Where freelancers manage their account, add clients, and send invoices.
- Client Control - Where clients log in, view projects, and pay invoices.
I started the next day.
Designing Live Mockups for Mission Control
It took four days to design and build out the pages, tables, forms, and panels for the freelancer's mission control.
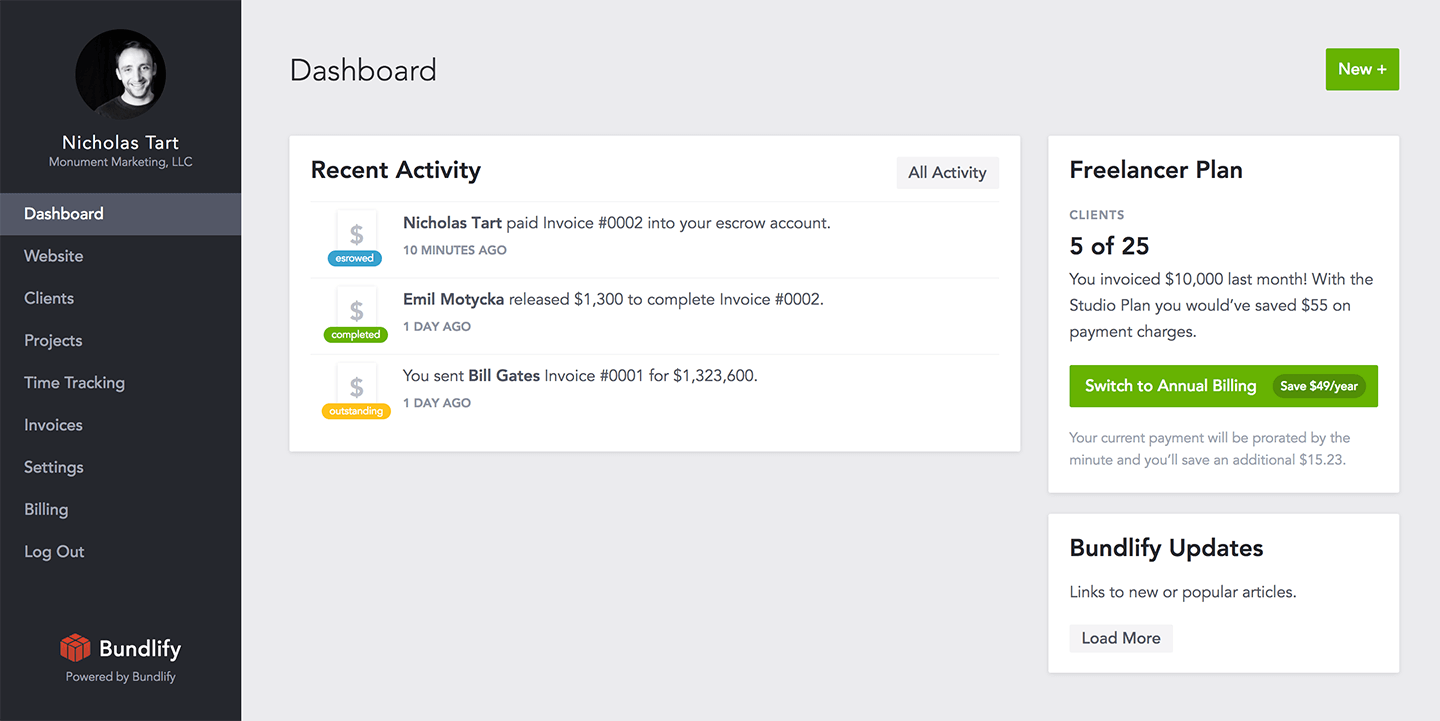
Here's the basic dashboard with recent activity, current plan, and a few base components.
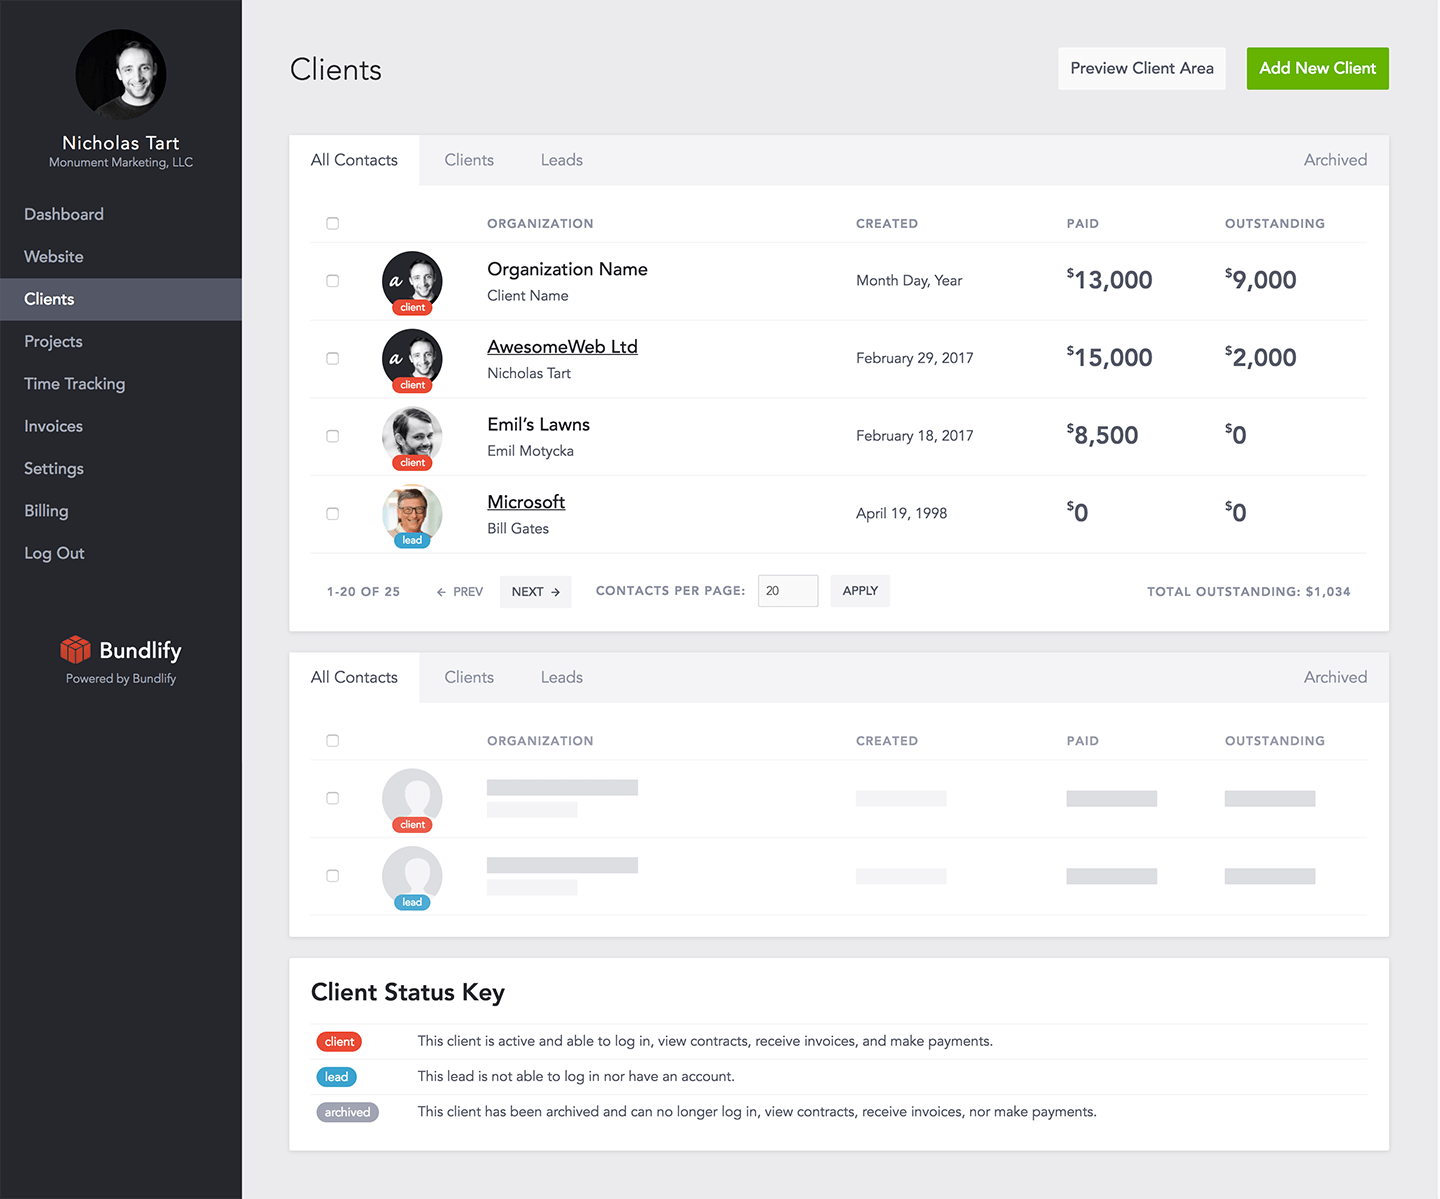
How I imagined the data tables for clients, projects, contracts, invoices, etc.
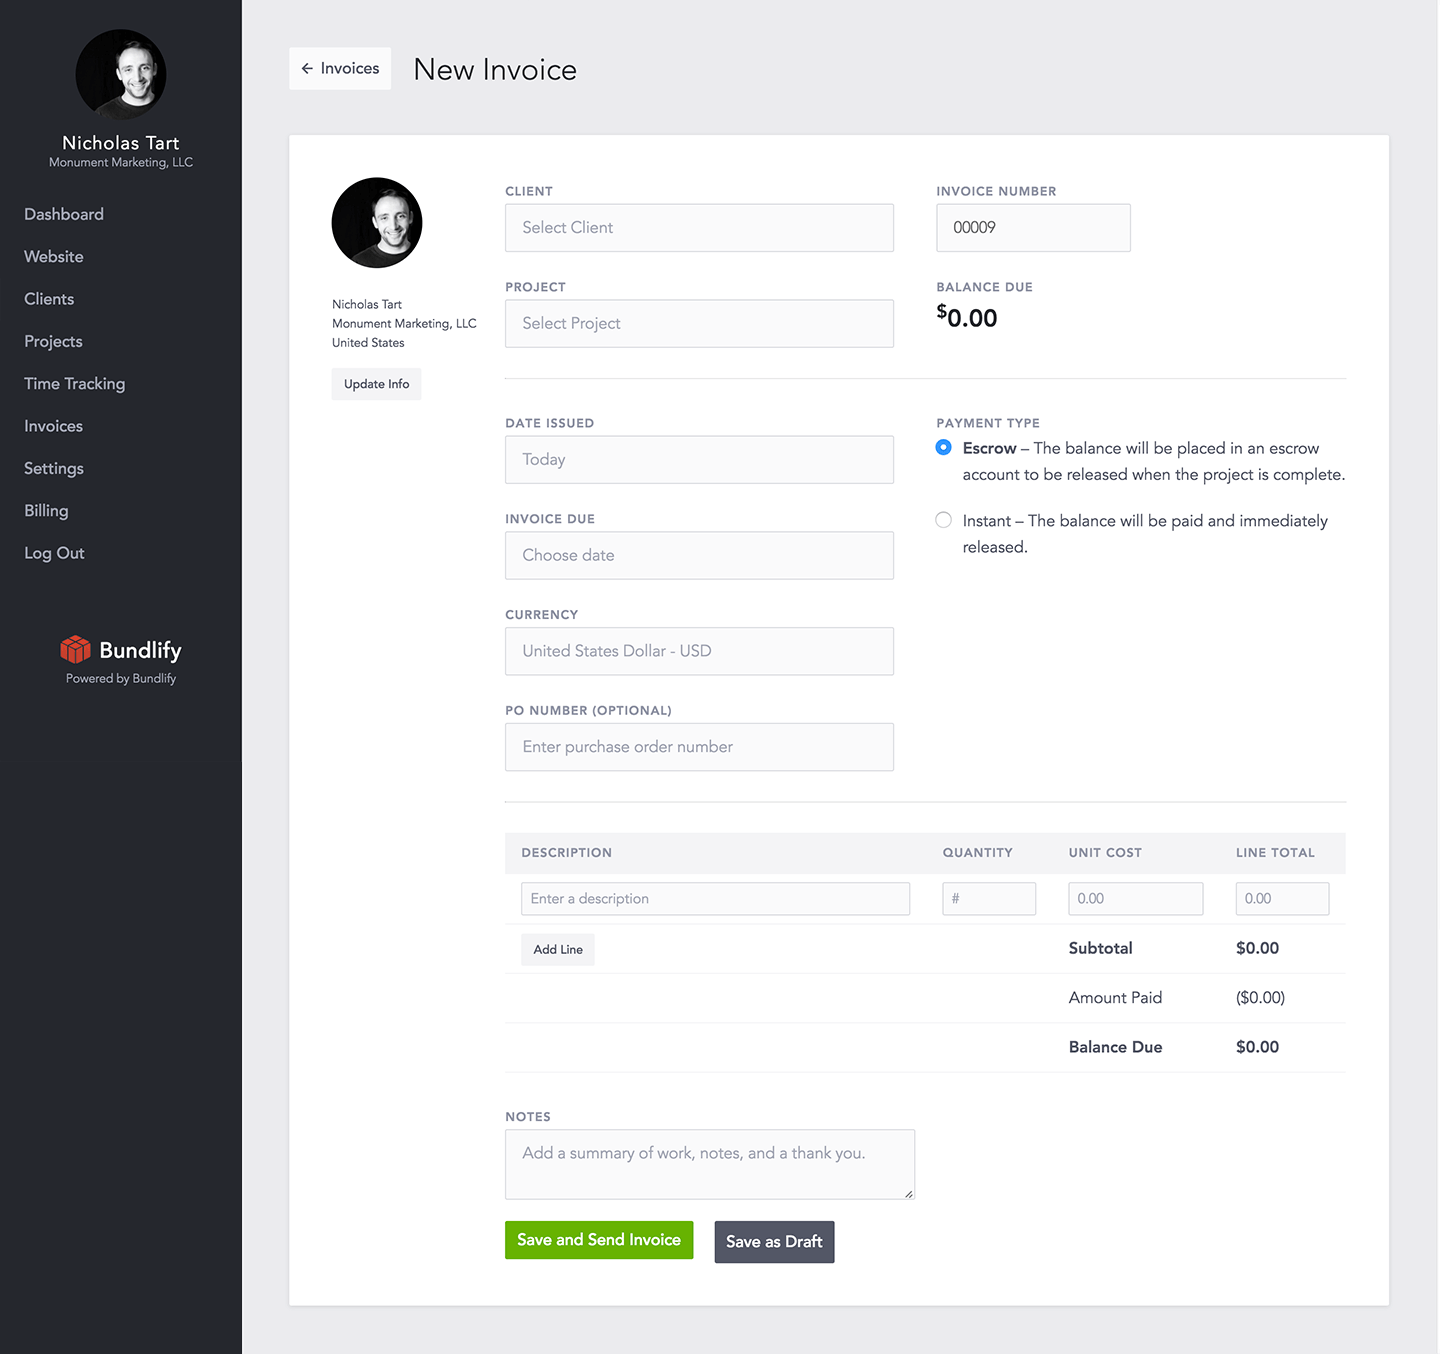
The create invoice page and with base form, label, input, and button stylings.
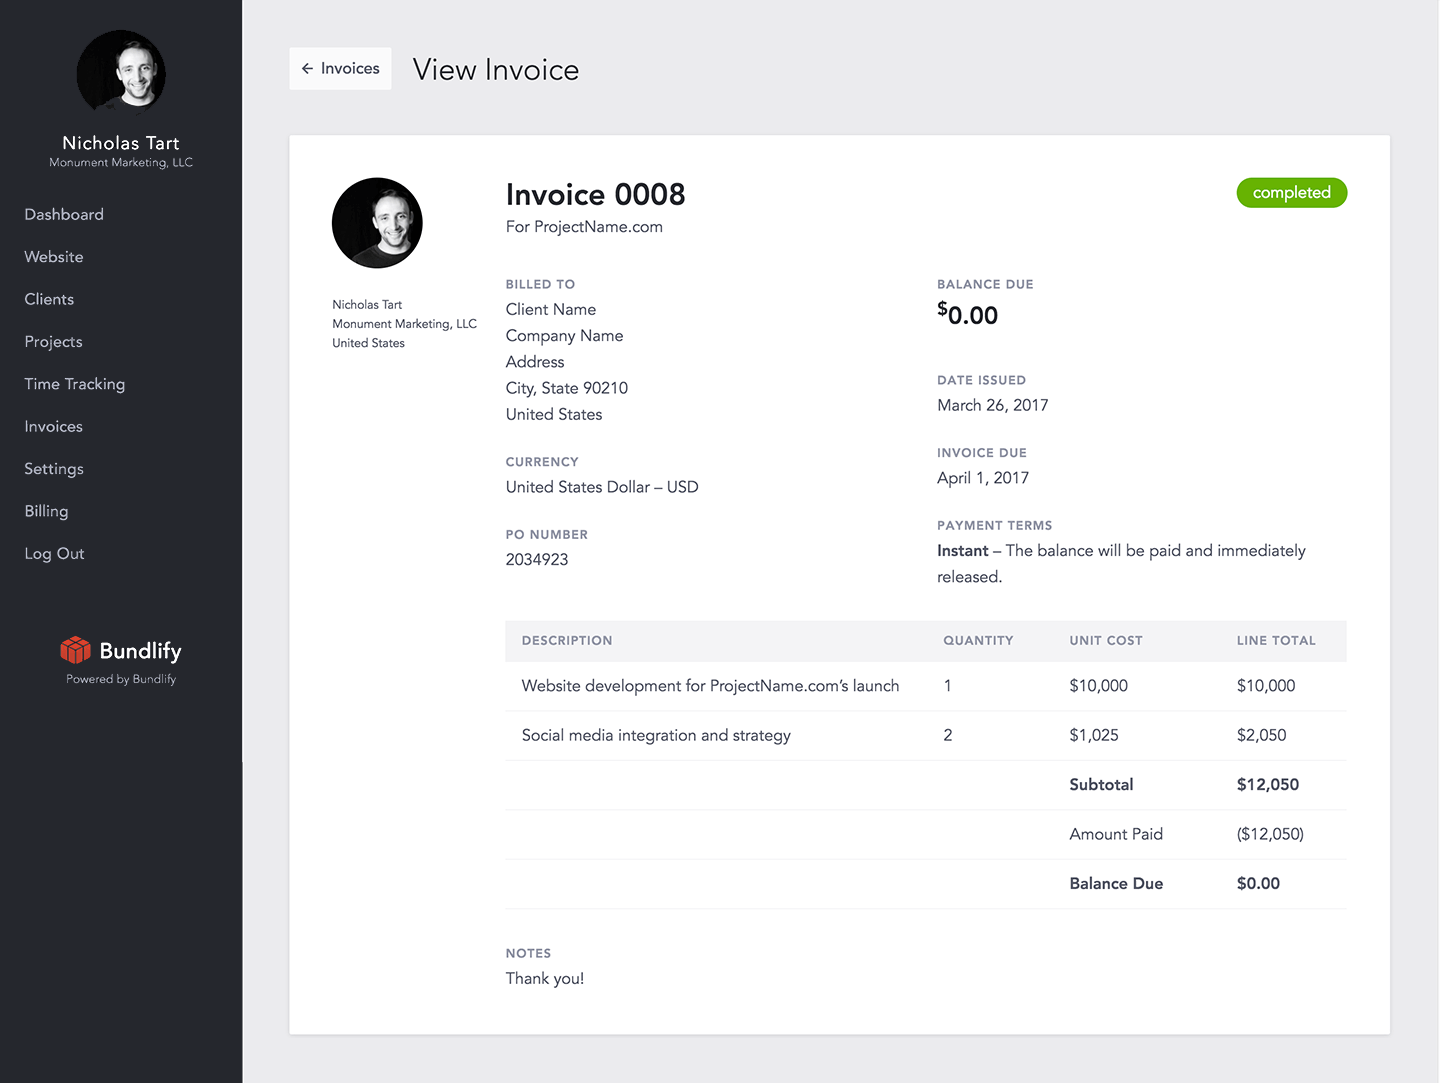
Each item—client, project, invoice, etc.—needed a view panel. This was the layout for an invoice with the status in the upper right.
We could've mocked up the site in Photoshop, but we'd rather have static screens that we could click through as though they were live. Plus, something we can reference and re-design on the fly.
Designing Live Mockups for Client Control
Once we had the base styling and components for the mission control, it was easier to build the client pages and views.
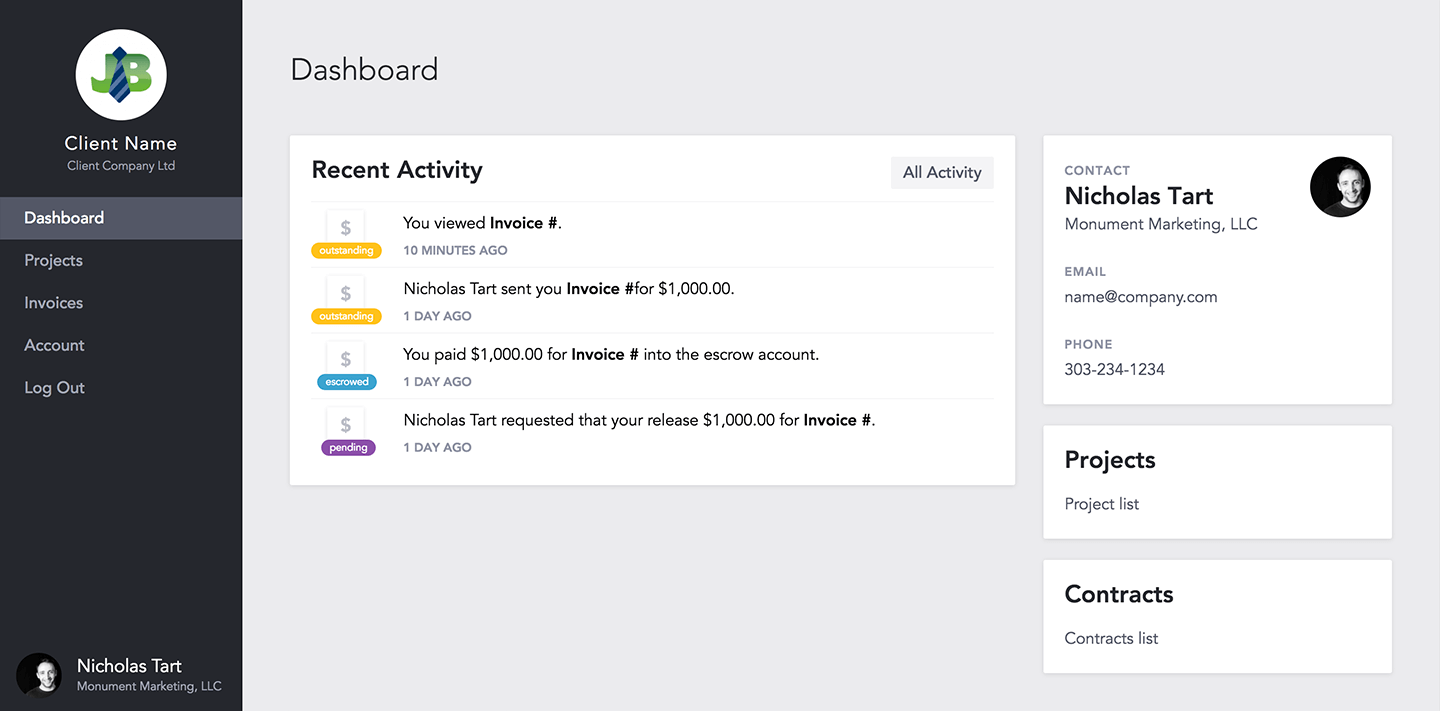
This is the client dashboard. Same style as mission control, but clients are limited to paying invoices and viewing their account.
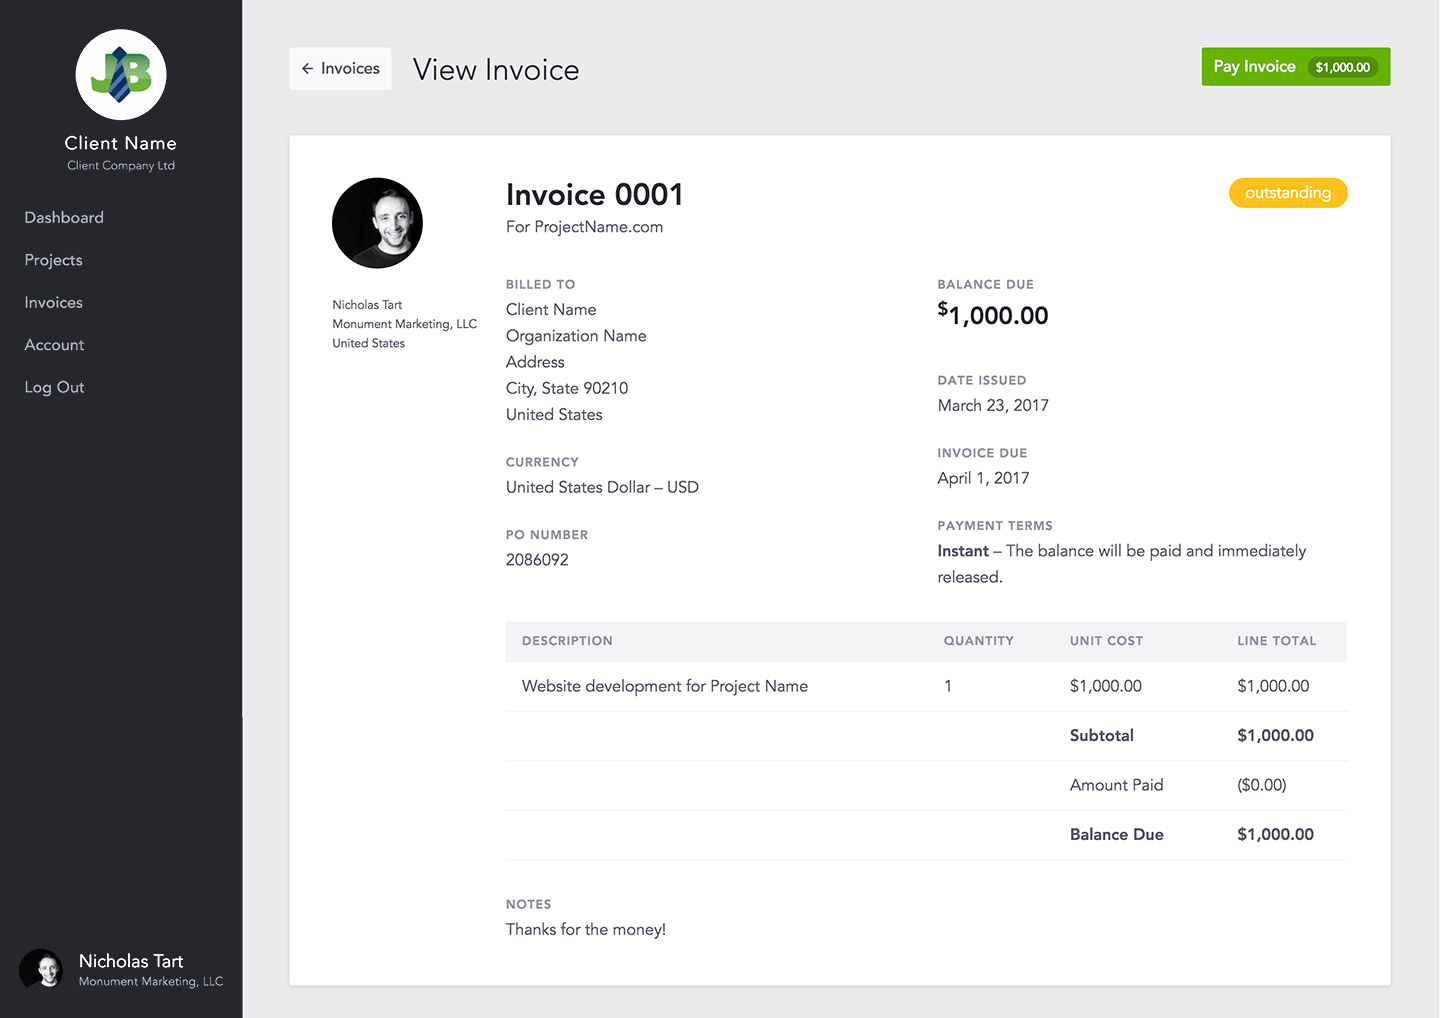
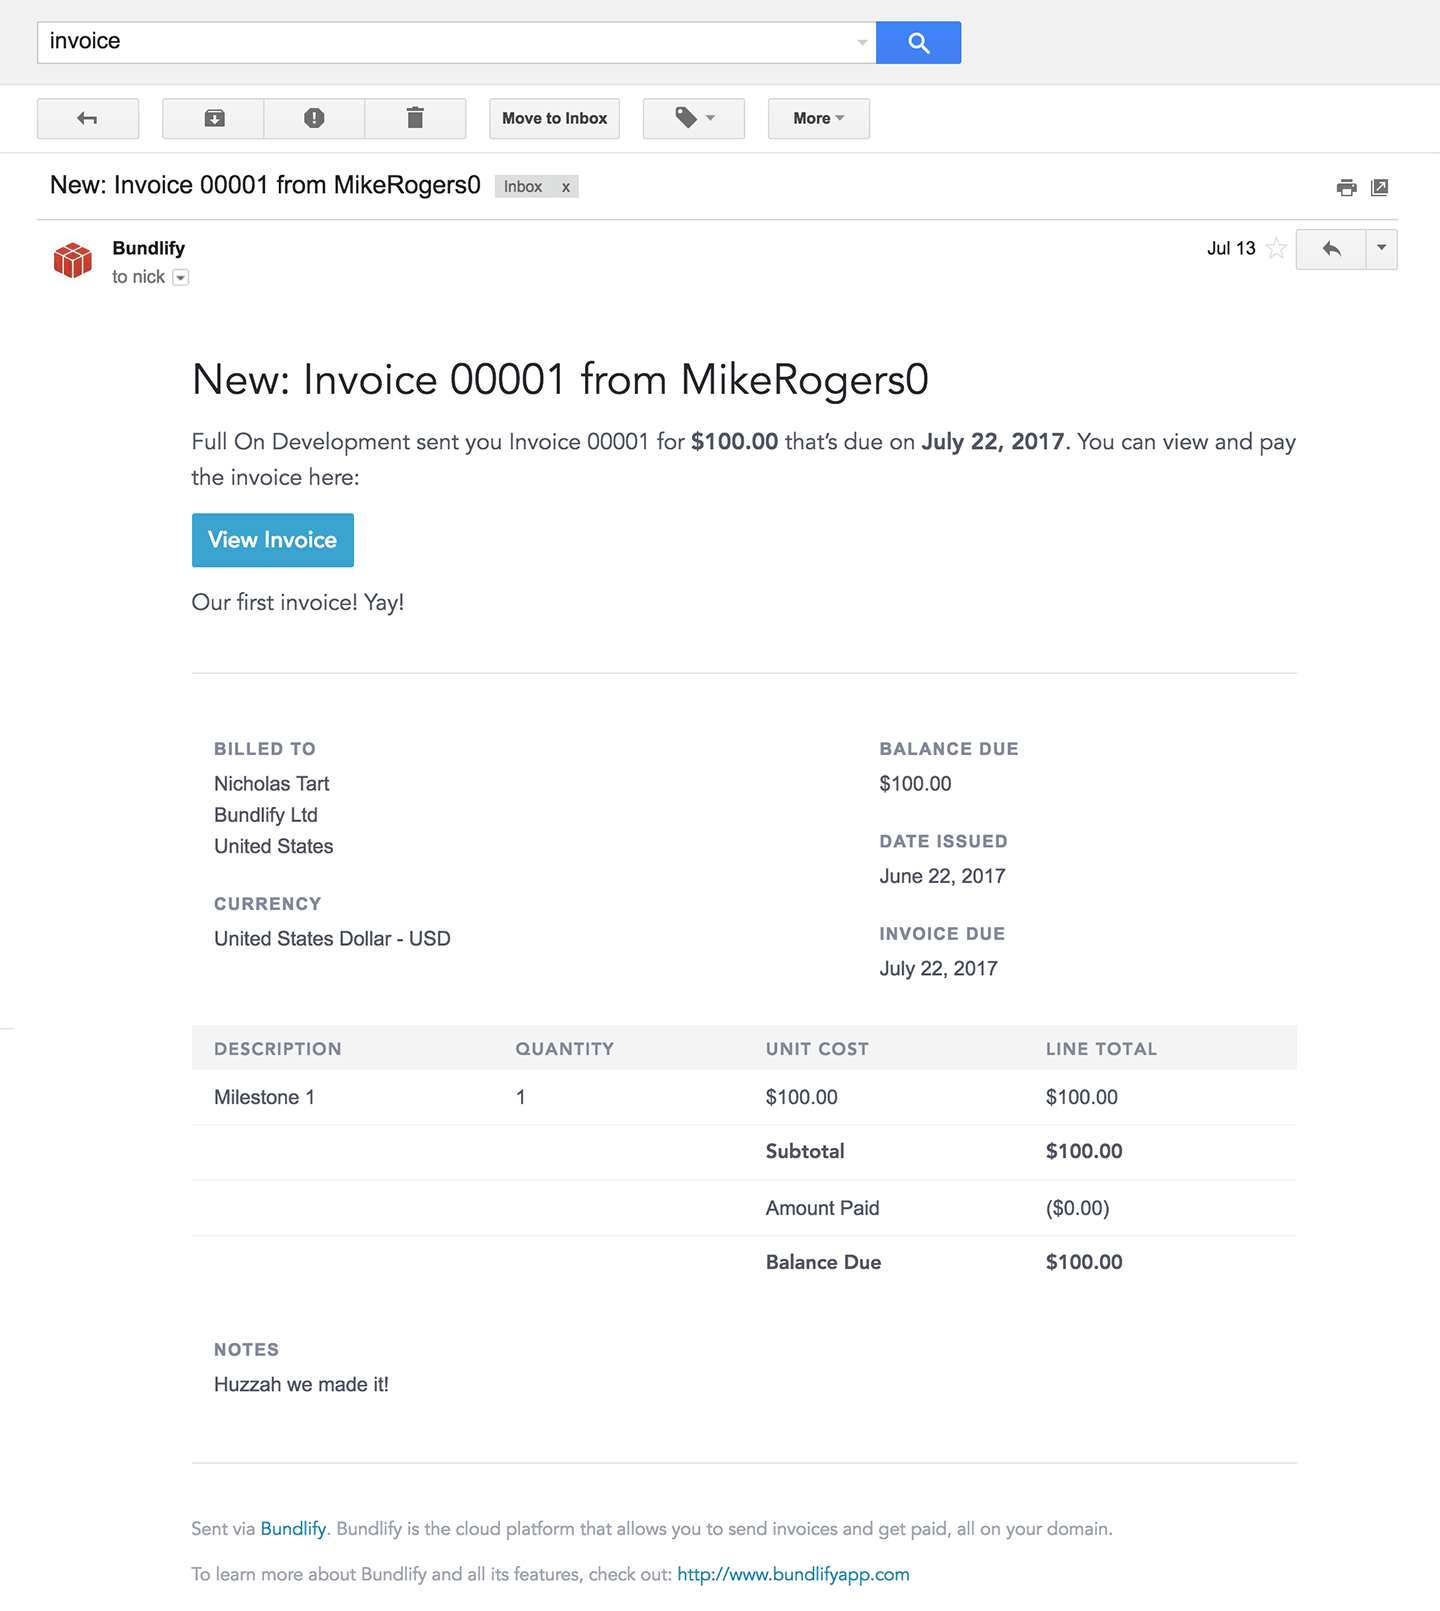
When a client receives an email and views the invoice, they get taken to this invoice page.
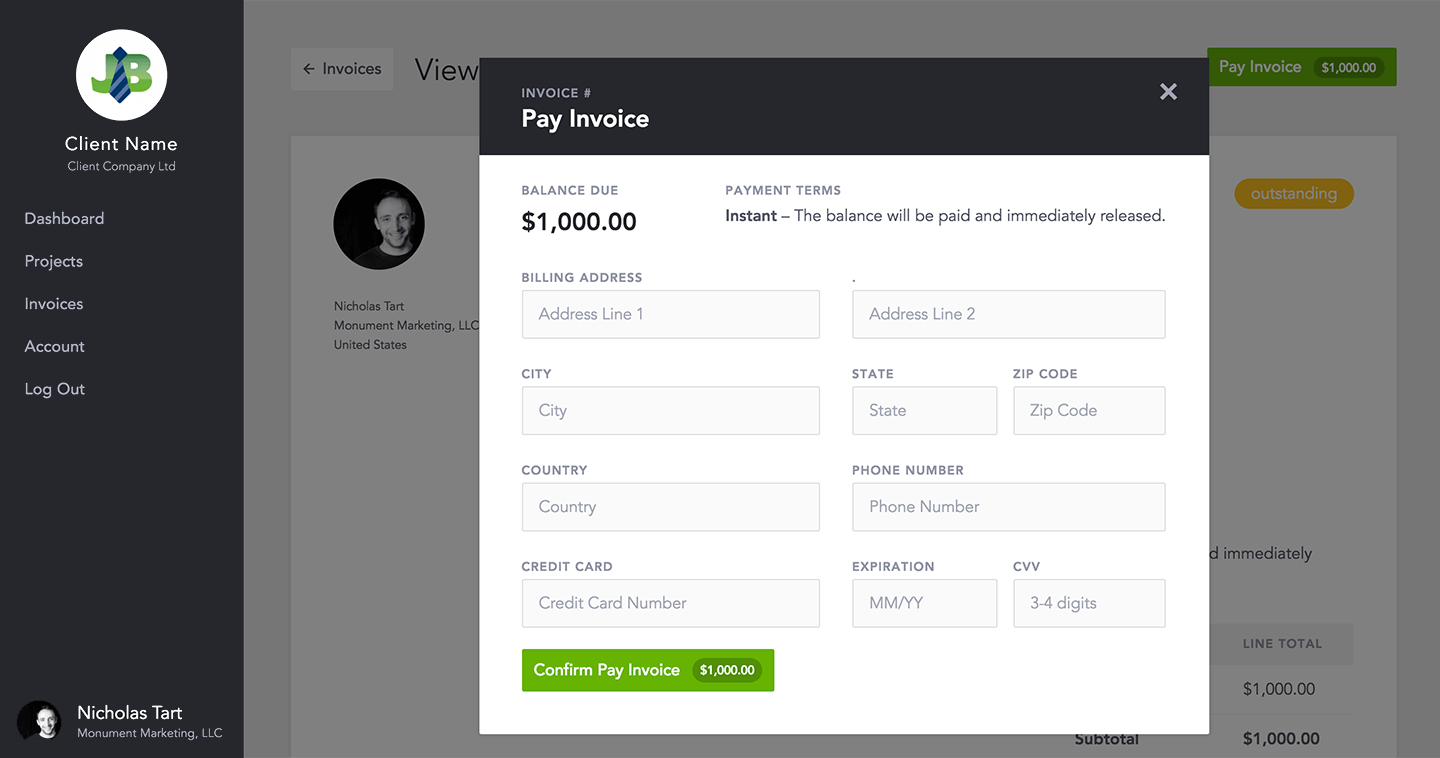
They fill out their credit card details and pay the invoice with a click.
Whether they're on a desktop or mobile device, clients need to be able to pay invoices as easily and quickly as possible… all while knowing that they can access their accounts at any time.
Keep in mind, these were the initial mockups. The final web app will look slightly different.
Defining the Fastest Route to a Happy Product
Now that we had clickable prototypes for both the mission control and client control, we negotiated the minimum happy product.
What's the core problem? What needs to be built to solve that problem? What is less necessary for now?
The core problem is that freelancers often fail to get repeat or recurring business partly because they have unprofessional freelance processes—with invoicing being the client's most important touchpoint.
We asked around. You'd be surprised by how many freelancers still send Word document invoices. I'd have a hard time recommending that person.
The core solution is an easy-to-set-up, low-cost, no-maintenance way for your clients to have a 100% branded journey from first message to final invoice. Making it fun for clients to work with you and easy to recommend you to their friends.
With the core solution in mind, here are the features we kept:
Here are the features we've cut (for now):
After negotiating the MVP, we built something to help us bypass the black hole of technical debt.
Technical Debt Busting Style and Component Guide
Avoiding technical debt—short-term coding decisions that lead to extra work long-term—was one of our top priorities.
The best way to sidestep technical debt is to start with a style guide.
So that's what we built.
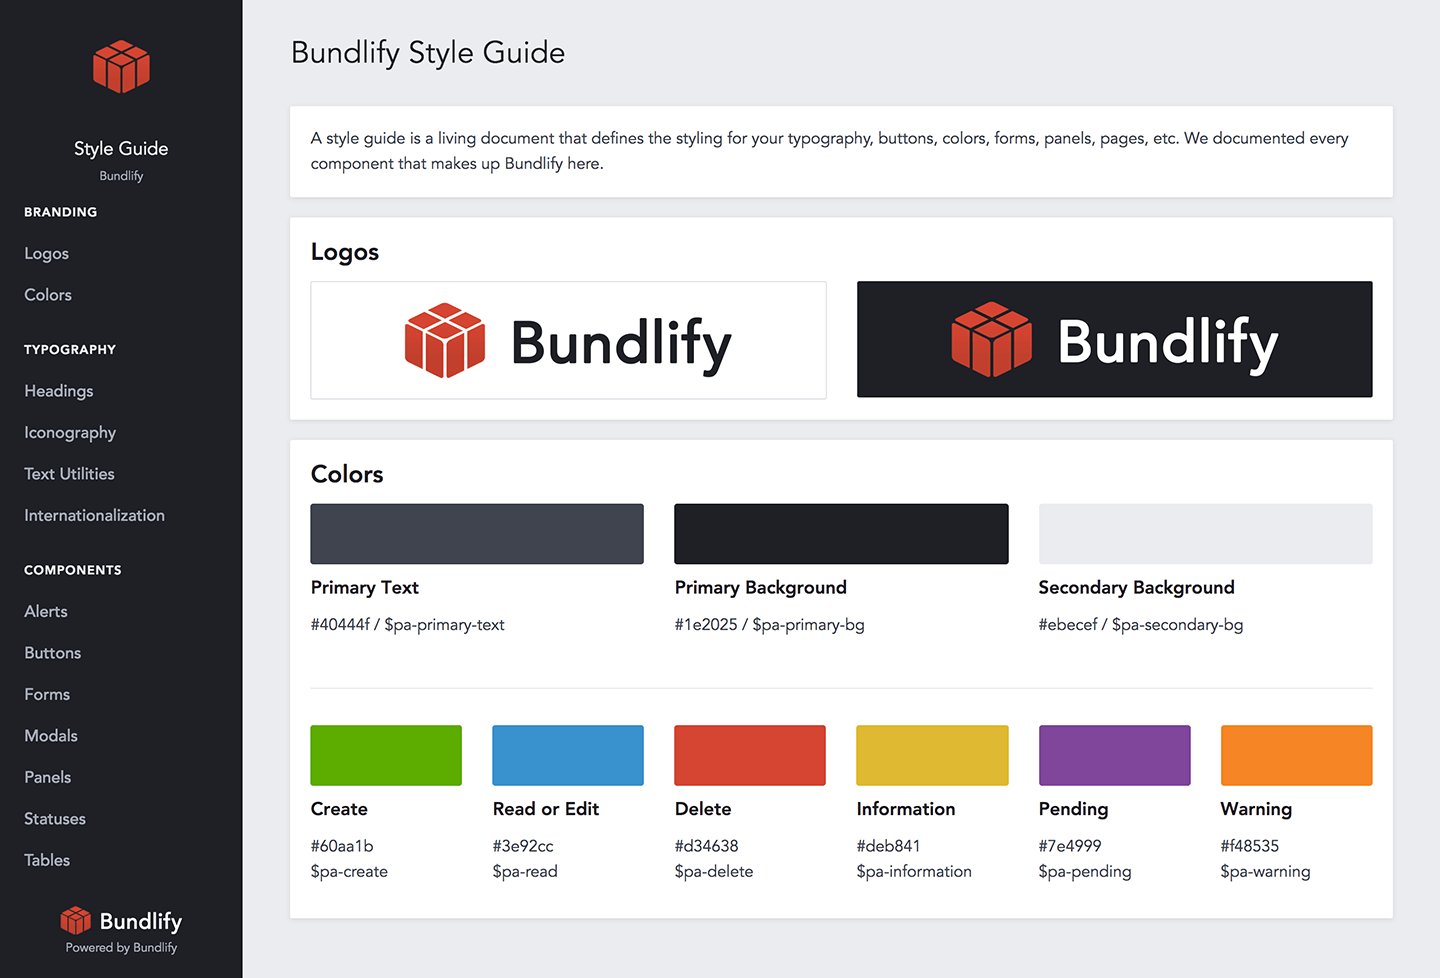
A style guide is a living document that defines the styling for your typogpraphy, buttons, colors, forms, panels, pages, etc… Also known as a component guide or pattern library.
Here's what we get out of it:
- Consistency in design - Every word, button, color, input, panel, page layout, etc. is styled exactly the same in every instance, whether you're on the marketing site or the web app.
- Ease of build - No more guessing how things should display on the page. If it's not in the style guide, it's not an option. Plus, it'll grow with us as we introduce new components.
- Shared assets - The style guide is a separate app where we host our CSS, JS, and other assets. If we update the logo, we switch out one file and it propagates everywhere.
- Saves time in development - When components are designed and defined, you don't have to add a bunch of classes to every element. The component has one style regardless of context.
- Quick reference - If we need to design something or create a graphic, we can copy/paste the colors from the style guide.
- Painless changes - At one point we updated the colors. All we had to do was replace six hex codes in one file and all other colors—for hover, active, text variations, background varitions—were auto-generated.
- Onboarding new people - When we start hiring other designers and developers, they'll have everything they need to follow our brand guidelines.
The reason we were able to develop and build features so quickly is because we didn't have to think about front-end. Even if we were to redesign everything from scratch, now it's only a matter of redesigning the components.
This will be a big advantage moving forward. And it only took a week or so to create.
You can find our complete Bundlify Style Guide here.
Marketing Site and Web App Foundation
Now that we had live mockups, a well-defined MVP, and an established style guide—all in just over a month—it was time to start building.
Every SaaS company has two main sites:
- Marketing site - Sales copy with marketing funnels. You're on our marketing site now 😀.
- Web app - The software that provides the service.
In the second month, Mike set me up on Middleman for the marking site and he started building the web app with Ruby on Rails.
Marketing with Middleman
It took about a month—off-and-on—to build the initial marketing site, with the bulk of the work upfront.
Here's our initial blog page layout:
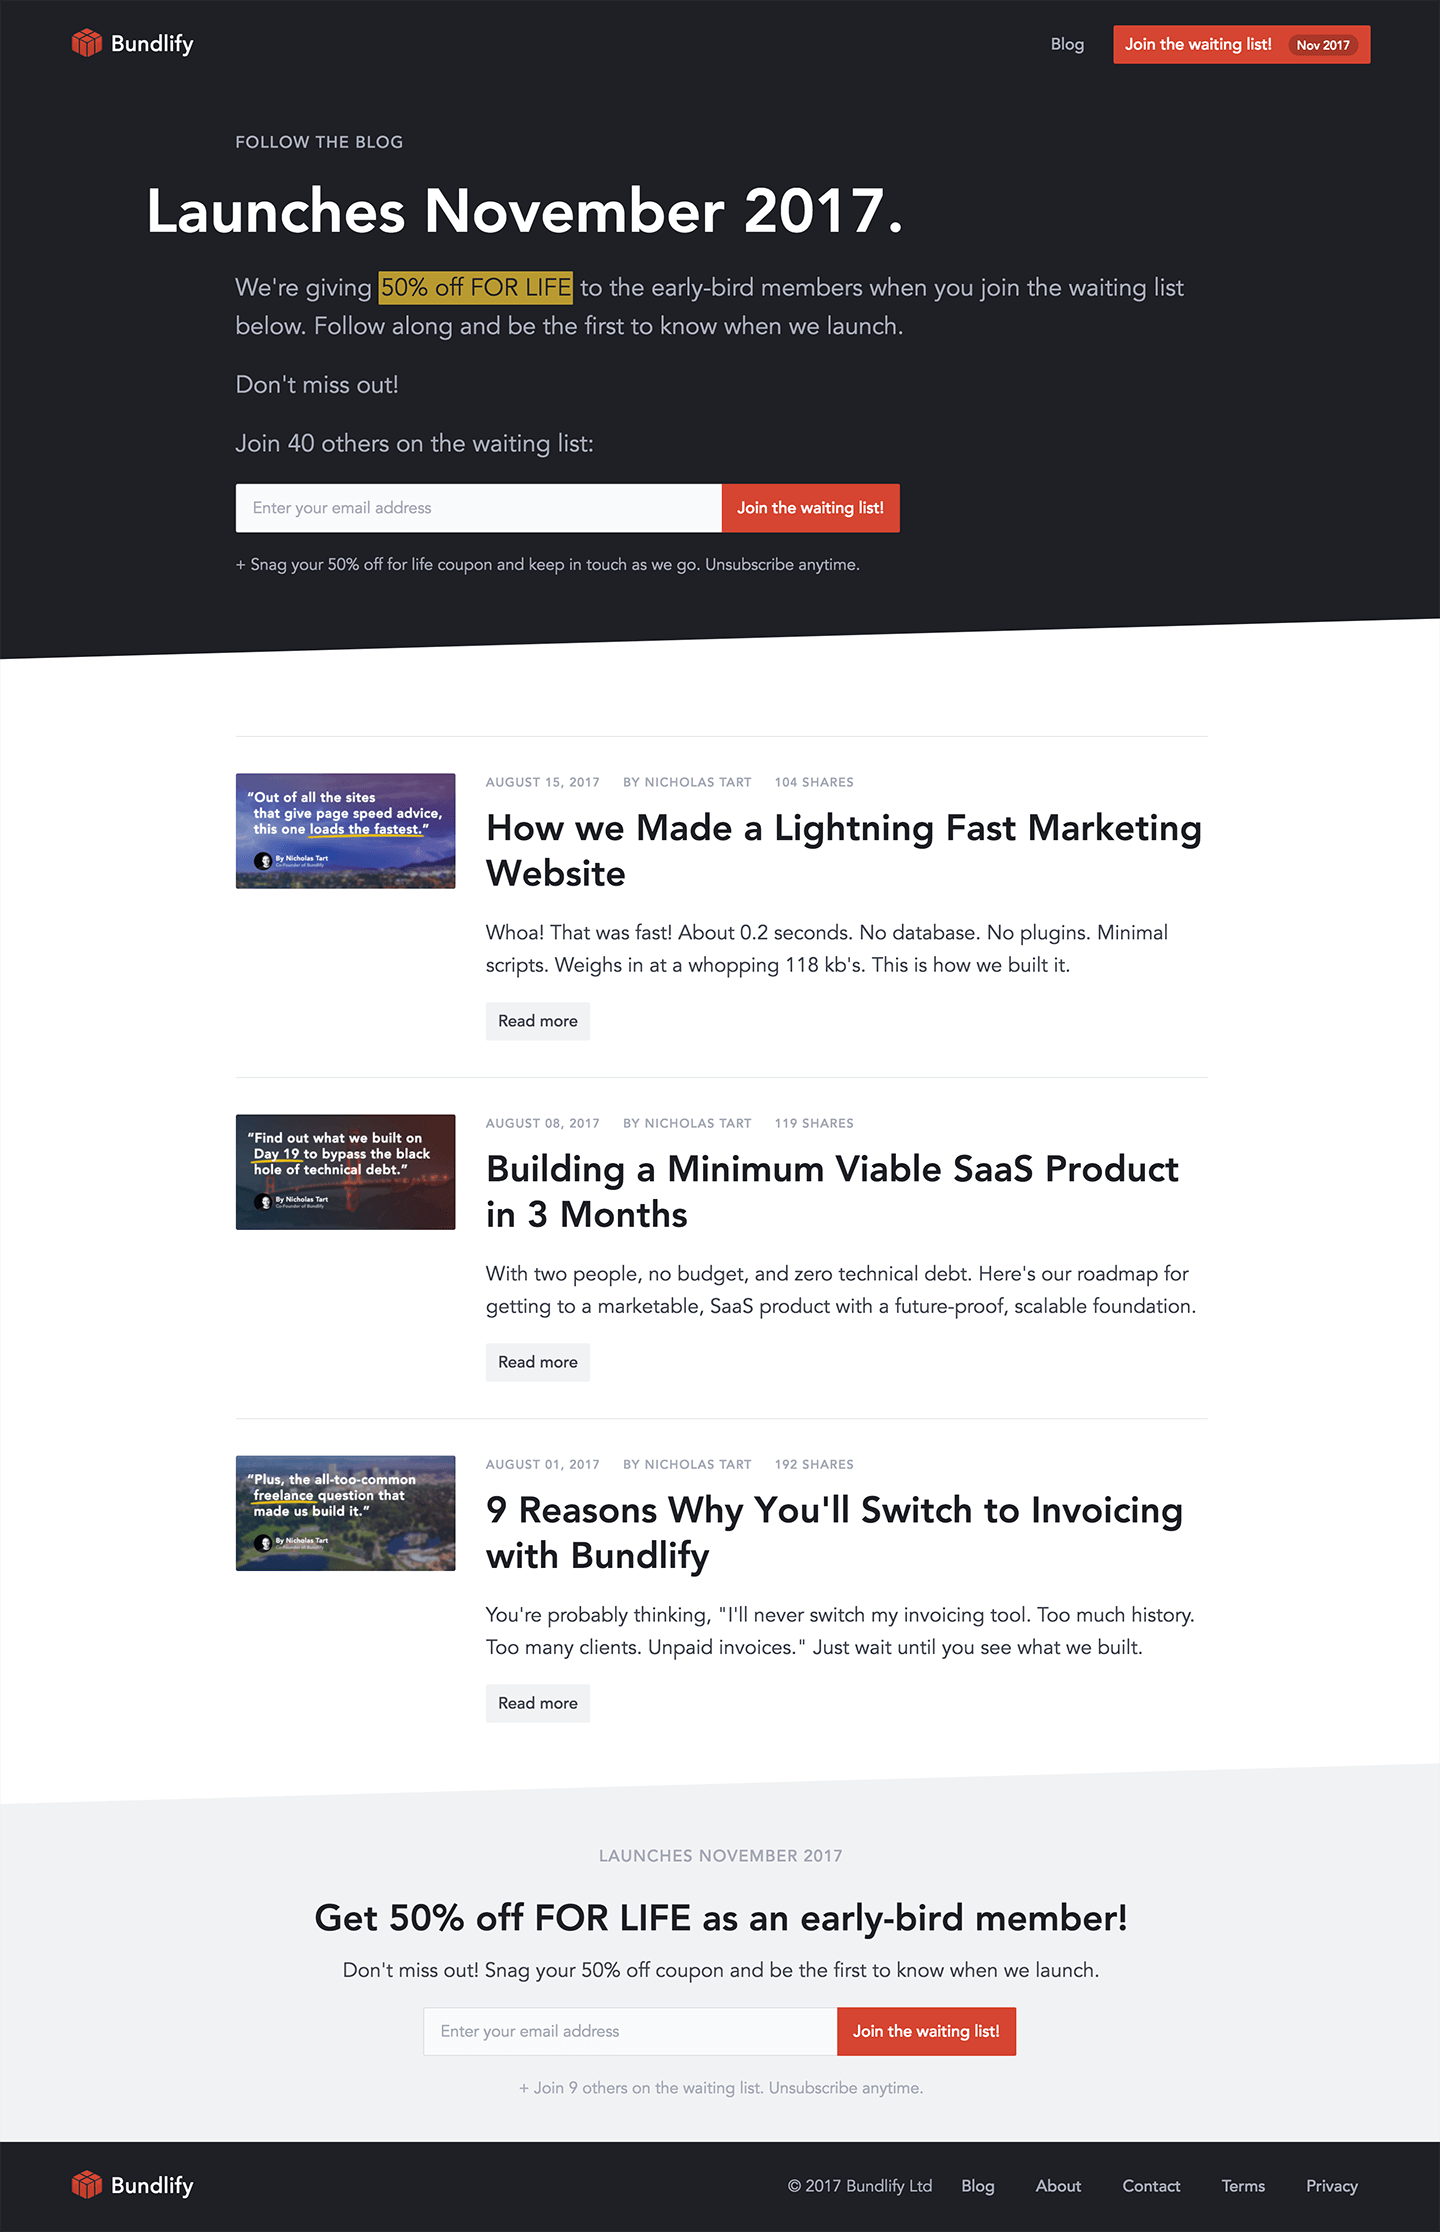
We were going to use WordPress but decided go with Middleman for a few reasons:
- Performance - Middleman is a static website generator which means there's no database. Since there's no database, our marketing site will always be lightning fast. According to Pingdom, it's faster than 100% of the sites they've tested.
- Security - One of WordPress's biggest downsides is that it's under constant attack by hackers. 26% of all websites run on WordPress and they publish their vulnerabilities with every version update. Here, there's no database nor admin area to hack.
- Inexpensive - We pay about $2/month for on-demand hosting and a content delivery network.
- Versatility - As a one-man marketing department, I can make changes and push to production in seconds.
- Cleanliness - Writing in pure HTML and CSS means that the design is predictable and scalable regardless of screen size or device.
To be fair, there are a few drawbacks as well:
- Familiarity - Everyone knows WordPress. Even a first-time user can work within their CMS. Not as many people are comfortable working in a file editor and terminal. Might be a challenge to hire.
- Dynamically-generated landing pages - If we had a database, we could create tables and dynamically pull content to display in an unlimited number of places (i.e. tagged testimonials on industry-specific sales pages). However, there are ways in Middleman to work around this.
- Comments with Disqus - We also couldn't have people leave comments on blog posts without a database. We went back-and-forth on the best option here and settled on Disqus. Make sure to leave a comment below so we can validate this decision.
Overall, worth it.
Building the Web App with Ruby on Rails
As I was building the marketing site, Mike started on the web app.
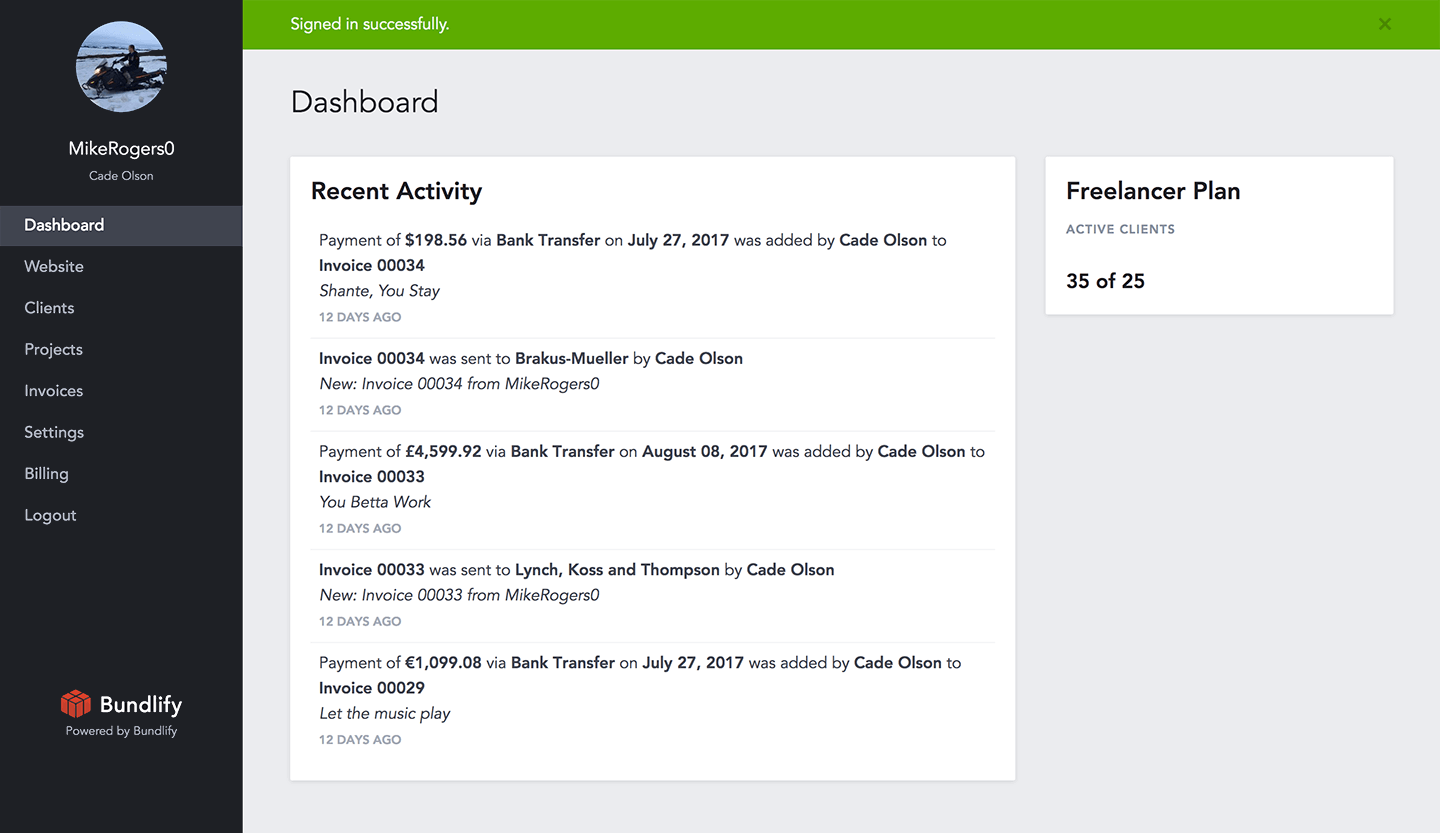
In the first month Mike built out:
- User accounts - People can sign up, log in, and manage their accounts.
- Basic layout - Navigation on the left with the workspace on the right.
- Dashboard - Recent invoice activities and current plan.
- Account settings - Account details and invoicing information.
- Website settings - Headline, tagline, and call-to-action for your homepage.
In a little less than a month, Mike had a live version of the app connected to his subdomain. Here's a sneak peek:
Why Ruby on Rails?
We chose Rails for two reasons:
- We're familiar with it - Mike and I have been working on a Rails project together for the last three years.
- We know other Rails developers - It's helpful to have people around you who can answer questions or be available for hire. We don't know as many JS framework developers.
Wrapping up Marketing Site and Dog-Fooding a Functional Web App
Mike and I both finished the laying-of-the-foundation for the marketing site and web app at the end of month two.
We spent month three building out the core functionalities for each.
Marketing Site Functionality and Pages
Once the layout was there, it was time to write and create the pages we needed to have a functional marketing site.
Here's the list of pages we created:
I know this seems like a lot, but to us, these were the minimum pages we wanted for a proper marketing site.
Wrapping up the MVP Web App
This was an exciting month for us because everything came together so quickly:
- Clients - You can quickly create accounts within your account for your clients to access and pay invoices.
- Invoices - Attach invoices to projects and send them via email to your clients.
- Connect to Stripe - With one click you can connect Bundlify to your Stripe account for handling payments.
- Connect to Domain - Run Bundlify on your custom domain or ours.
As our MVP-is-complete test, Mike sent me a real invoice. I paid with a click and the funds went to his Stripe account. All on his domain.
Right on schedule!
MVP is Complete, But Not Ready
Mike and I are both dog-fooding the MVP by using it to invoice our clients. The response has been amazing.
By using it ourselves, we know you're going to love it. It's also helped us fix the UX in a few important places:
- Deleting invoices - Should be able to delete unpaid invoices.
- Itemized invoice UX - Line items should focus when we add a new one.
- Stripe by default - Stripe should be auto-checked as a payment option for unpaid invoices if you connect Stripe after sending an invoice.
- PDF invoices - Client wanted a PDF for the paid invoice. So Mike built it over the weekend.
We expect this list to get longer as we continue to use it.
Finishing the Onboarding, Free Trial, Subscription, and Importing Systems
We're still building the tools you'll need to have an amazing experience.
- Onboarding - The first-run experience from the signup form to sending the first invoice.
- Free Trial - We're going to have a 14-day free trial and need to build out the notifications and pages.
- Subscription - Where you can start your payment subscription, edit your billing details, and upgrade/downgrade plans.
- Importing - Easily import your data from FreshBooks, QuickBooks, or a CSV.
Keep in mind, as a bootstrapped SaaS app, everything we've done here has been part-time work. We both have other projects and clients.
We're working as fast as we can.
If you'd like to help, I'd love to hear what you're using for invoicing now and what you like and dislike about it.
Let me know in the comments below!